vPAR QuadRadar - ASDE Display
March 1, 2005
Michael Oxner
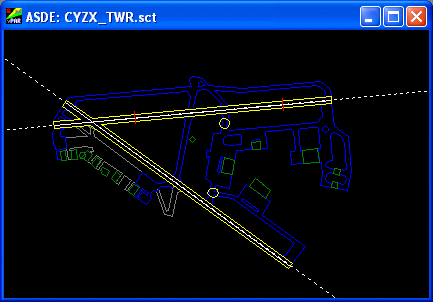
A totally new feature in vPAR is another of the four functions of a Quad
Radar, the ASDE or Taxi display. The intent is to have another top-down
view, but this time a very close-range view of the airport. This allows
you to view the airport details and watch aircraft in close proximity to,
or actually on, the airport's maneouvering areas like runways and taxiways.
If you're working TWR as well as PAR, this could come in handy. The catch
is that only aircraft connected directly to your vPAR host will show. Other
aircraft, regardless of whether they are connected to online servers of
an organization or Flight Simulator multiplayer session, will not show up
here. Likely, ASDE is of limited value. If you plan to use it, make sure
you tell the pilots not to disconnect until you tell them to, or tell them
that you will disconnect them and use the Connection Manager to "boot" them..
 The ASDE display is very much like the Traffic display in so many
ways. In fact, much of the same code was used, but brought to a smaller
scale. I'll basically just repeat the details from the Traffic page here
and add a few specifics for the ASDE itself. Of particular note is the
update rate on the ASDE display. It updates every 2 seconds,
compared to the 5 second update rate of the Traffic display. Read on to
see what effects this will show.
First off, the targets are also a digital representation
of the position of the aircraft. In Canada, where I am, the display
is not all that dissimilar from what is used in the civilian world on
the ATC screens. A hexagon shows the target with dots indicating trail
history behind. The size and color of the targets as well as the color
and number of history trail dots can all be changed in the ASDE Setup
screen detailed below.
For the Data Tags, the Ident entered into a pilot's vPAR Transponder
will be the aicraft ident in the tag, the current Mode C readout in
standard 3-digit format (showing hundreds of feet), as well as the groundspeed
(in tens of knots) are the normal items displayed. As on the Canadian
civilian radar screens, I have added the VMI (Vertical Movement Indicator)
and VMR (Vertical Movement Rate). The VMI in real life is an up
arrow or down arrow, but here it's a + or a - depending on whether
the aircraft is climbing or descending. Also like the Canadian screens,
the VMR is calculated over four updates and displayed only if it is 500
fpm or greater. Aircraft climbing or descending slower will
still show changing Mode C readouts, but no VMI or VMR. Tag direction,
leader line length, color and text size are also
user-adjustable. Tag direction is adjustable either by the Setup
screen or by use of the NUMPAD keys. Please note that the different
update rates between the Traffic and ASDE displays provide different values
to work from when it comes to altitudes and groundspeeds and the calculation
of them. This means that you may very well see different altitudes (not
normally different by more than one or two hundred feet unless the aircraft
is really climbing or descending fast), different VMRs, and different groundspeeds
than what you're seeing on the Traffic display. Acceleration/deceleration
of groundspeed and climb rate will show up here before they show on the Traffic
display since this screen has the higher update rate.
The Sector Map support for Traffic and ASDE screens is meant to
read ProController/ASRC sector files already in existence. This
allows you to load your current files in vPAR. Individual features have
selectable colors (except GEOGRAPHY which is specified in the sector
file) just as ProController and ASRC allow. The symbols are different
(like VOR's, NDB's, etc) in these two programs, so be aware of what you're
looking at. The "PAR Block" available on the Traffic display is not available
on the ASDE display.
The range displayed is adjusted using <F7> and <F8>,
or by using the menu items in the Display menu. Frequently on ASDE, you may
wish to "decenter" your radar display, so you can look further to one side
of the airport than another, or, since the default center position is that
of the Lat and Lon specified for the runway threshold in PAR Setup, you're
likely just to want to center the airport in the window. To pan the display
around, all you have to do is right-drag the mouse cursor within
the ASDE display and you'll move the center around. When you close vPAR,
this "offset" is saved as well. If you wish to reset the display to
the default center again, you can use <F5>, or use the
menu item in the Display menu. Also, <F6> can be used to toggle
to full-screen ASDE or back to previous view.
ASDE Display Setup
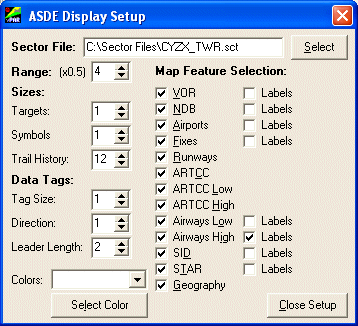
 The ASDE Display Setup Dialog is mostly identical to the Traffic
Display Setup Dialog. The first box displays the path and file
name of the currently displayed sector file. To select a sector
file, click the "Select" button, then navigate to the file
with the standard Open File dialog and select it. The file name
will automatically appear in this box if it is successfully loaded and
the ASDE Display's title bar will reflect the change.
Next, the Range selector. This was originally meant to be adjusted
only here. During testing, I found that I actually wanted to adjust
the range more than I thought, and even with the keyboard shortcuts, getting
into this dialog, adjusting range and closing it was cumbersome and slow.
Then I added the F7 and F8 keys for range adjustment, so you'll
not likely use this feature on this page.
Under Sizes, the Targets spinner changes the size of
the targets. The Symbols spinner changes symbol size for VOR's,
NDB's, Airports and Fixes, if they're in the sector file and displayed.
Trail History adjusts the number of trail dots, from 0
to 20. Remembering each update is 2 seconds, the default value
of 12 dots reflects 24 seconds of trail time.
Data Tags allows you change the size of the text in the
tag, the direction of the tag with respect to the target, and the
length of the leader line that connects the target and the tag. The
direction of the tag data can also be altered without entering the setup
screen by use of the NUMPAD keys. Tag direction changes made
with the dialog box affect all tags on the ASDE display, and use of
the NUMPAD keys affects ASDE tags only while the ASDE window has focus.
So if PAR has focus, the NUMPAD keys will not change the tag direction. If
Traffic has focus, the NUMPAD keys will change Traffic tags instead. Just
click on the ASDE window before hitting the NUMPAD key and this will give
the ASDE window focus.
Map Feature Selection is pretty straight forward. You simply check
the box next to the item if you want it displayed. Currenlty,
selecting SID or STAR shows all SIDs or STARs. Labels
for each feature, where available, are selectable separately.
The color selection process. Simply select the item
you want to change in the drop-down list, and click the "Select
Color" button below. This will open the standard Windows Color Selection
Dialog and you can then select the new color for the item you chose
to change. There is no "undo" function.
The only change from V1.XX to V2.0 for the ASDE Screen is the ability
to easily reset the position of the ASDE Setup screen. Since this window
could be inadvertently removed from the screen while dragging it, a facility
to reset to a default position was added in the menus across the top of the
main screen.
 The ASDE display is very much like the Traffic display in so many
ways. In fact, much of the same code was used, but brought to a smaller
scale. I'll basically just repeat the details from the Traffic page here
and add a few specifics for the ASDE itself. Of particular note is the
update rate on the ASDE display. It updates every 2 seconds,
compared to the 5 second update rate of the Traffic display. Read on to
see what effects this will show.
  The ASDE Display Setup Dialog is mostly identical to the Traffic
Display Setup Dialog. The first box displays the path and file
name of the currently displayed sector file. To select a sector
file, click the "Select" button, then navigate to the file
with the standard Open File dialog and select it. The file name
will automatically appear in this box if it is successfully loaded and
the ASDE Display's title bar will reflect the change.